Audio & webcam setup
If you joined with Microphone, the most important step comes next: your audio settings. Sounds trivial, but it's the difference between a relaxed meeting and 20 minutes of "I can't hear you - can you hear me? - wait, I think my mic is..."
Audio settings
After clicking "Microphone", the audio settings dialog opens. Here you check everything important before joining in one place:
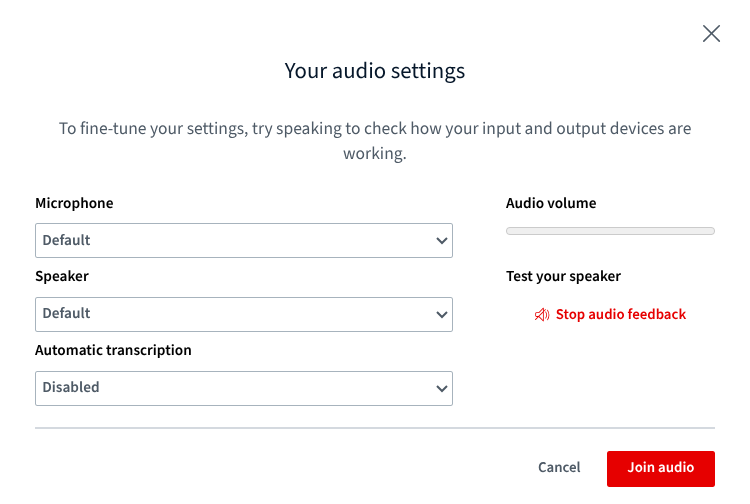
What you can configure:
- Microphone - your input device. "Default" uses whatever your browser/OS has set as the default.
- Speaker - your output device.
- Audio volume - say a few words. The bar on the right should react. If it doesn't, something's wrong with your mic.
- Test your speaker - clicking "Stop audio feedback" (or "Play audio feedback", depending on state) plays your own voice back through the speakers. If you hear yourself, both your microphone and speakers work.
- Automatic transcription - enable live captions. Disabled by default. Available on request.
Once everything checks out: click "Join audio" (red button, bottom right) → you're in the meeting and can speak. With "Cancel" you skip the audio join entirely.
Without a headset, feedback loops are common in meetings (mic picks up speakers → echo for everyone else). A basic headset for ~$20 solves 80% of audio problems.
Changing audio settings later
To change your microphone, speakers, or transcription later:
- Click the small arrow next to the microphone icon at the bottom center
- Pick Audio settings → the same dialog opens again
- Adjust and confirm with "Join audio"
Mute & unmute
The microphone icon at the bottom center is your switch:
- Red strikethrough = muted
- Black/white = live
Keyboard shortcuts:
| Action | Windows/Linux | Mac |
|---|---|---|
| Mute/unmute mic | Alt + M | Ctrl + Option + M |
| Leave audio | Alt + L | Ctrl + Option + L |
| Join audio | Alt + J | Ctrl + Option + J |
| Push-to-talk | Hold M | Hold M |
Hold the M key to speak briefly - as soon as you release, you're muted again. Perfect for quick interjections during lectures.
Etiquette: when to mute?
Rule of thumb: mute when not speaking. Especially in groups of more than 5 people. Background noise, keyboard clatter, and a pen-clicking are surprisingly loud in conference audio.
Enabling your webcam
The webcam is always optional - nobody is forced to show their face.
To enable it:
- Click the camera icon at the bottom center
- Pick your webcam (if multiple)
- Choose quality (Low / Medium / High - depending on bandwidth)
- Optional: pick a virtual background or upload your own image
- Click Start sharing
The first time, your browser asks for camera permission - click "Allow".
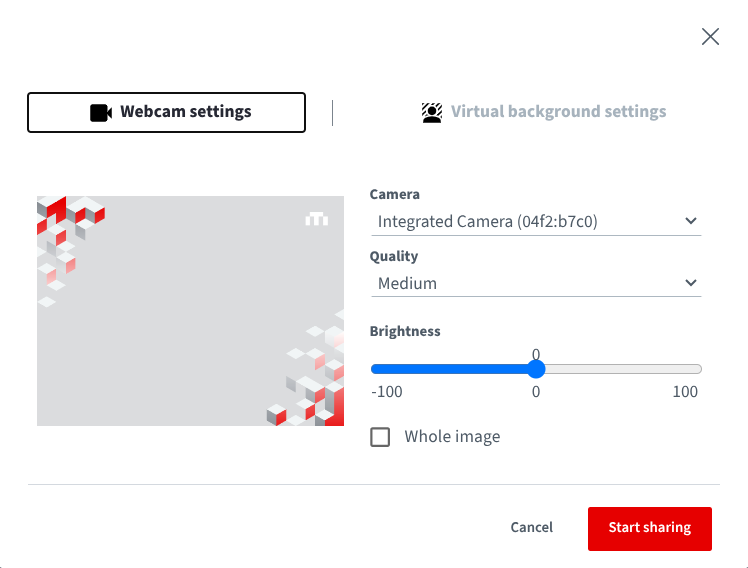
Webcam preview
The preview is mirrored by default since BBB 3.0 - so you see yourself as if in a mirror. Others see you normally. You can change this in settings.
Multiple webcams
BBB allows multiple webcams in parallel - for example, one as your face cam, another (such as a document camera) for hand-drawn sketches. Just click the camera icon multiple times and activate them one after another.
"Away" mode
If you need to step away briefly (door, coffee, kid):
- Click your avatar/initials icon in the participants list
- Choose Set yourself away
Your webcam is automatically dimmed, your mic is automatically muted. You appear in the participants list with a cloud icon. Coming back works the same way.
Bandwidth tips
If your picture stutters or audio cuts out:
- Reduce webcam quality (set to "Low")
- Turn off webcam when you don't need to speak
- Close other tabs/programs consuming bandwidth (streaming, downloads)
- Switch WiFi to wired if possible
Next chapter: Getting to know the interface - what all those areas and buttons do.